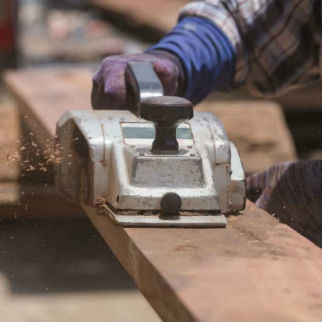
An electrical hand planer is one of those tools that is kind of mysterious and not in the spotlight as much as some of the other tools out there...
Right?
They do have a specific purpose though and can come in handy for certain things and in certain circumstances.

I wanted to answer all of these question and provide a mini resource that will de-mystify some of the more common questions that come up when you think of a handheld planer. Here goes...
What Is An Electric Hand Planer?
An electric (hand) planer is a tool used to take off small amounts wood by shaving it off in increments. They usually have two or three blades to achieve this and the maximum amount of material that can be removed in a single pass is usually around 1/8" (3/32" typically).
How Does An Electric Planer Work?
The basics of an electric hand planer work the same way a nonelectric model does, it just substitutes a fixed blade for one that rotates and is able to take off much more material in a shorter amount of time.
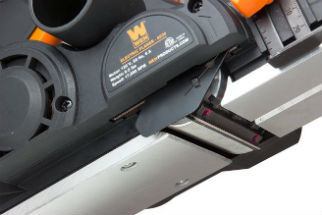
The picture on the right shows the blade location along the bottom of the planer.

The blade of the planer is mounted in the middle of two metal plates (often referred to as the "shoe"). You are able to adjust the front shoe which moves up and down via a knob, usually located near the front of the planer and this depth is usually a very minimal amount, since most hand-held electric planers only have a maximum cut depth of about 3/32 of an inch.
When you push the planer along a piece of wood the blade rotates at a very high RPM (usually between 10,000 - 20,000 RPM) taking off small amounts of material that leaving a very smooth cut edge. Depending on what surface you are planing and what you are doing, you may have to sand the planed surface to smooth out any imperfections that it might have left.
Most of the time, you will only take off about a 16th of an inch of material at a time and in some cases even less than that.Taking off smaller amounts of material at a time will produce a much smoother and more finished looking result in the end.
How To Use An Electric Hand Planer...
Using one of these handheld planers is a pretty simple process but there are a few little tips and tricks that will make your cuts smoother and avoid certain things from happening (like snipe) when using it. Let's take a look at what some of these tips are and a quick rundown of how to use an electrical hand planer...
- Make sure your workpiece is securely in place and will not move during the planing process, which can cause gouging and uneven amounts of material to come off if the workpiece moves in the middle of the cutting process.
- Adjust the planer to the appropriate depth, using the dial or knob located at the front of the tool. If you have an adjustable chip port (left or right side), then you'll want to adjust it to either the left or right side in this step as well.
If you are working with rough dimensional lumber that will not be visible than you can take off the maximum amount of material that the planar is capable of taking off at a time but if you're working with finish pieces of wood, where precision and a more finished and product is needed, then I would recommend taking off smaller amounts in multiple passes to achieve the desired final thickness you want to remove. - Rest the front edge of the tool on the workpiece as much as you can with out the blade touching the workpiece. If the blade is resting on the workpiece and you turn on the planar, it will gouge that spot out of the wood and you'll have to do a little extra work to get that out of the workpiece.
Get a good feel for the balance of the tool and make sure that you are in a comfortable position and that there will not be any movement (wobble) from left to right on the planar as you are cutting. - Pull the trigger on the tool and let it get up to it's full operating speed. Take your other hand and place it on the depth adjustment knob (for added stability and control).
- Slowly start pushing the planer forward (onto the material) and maintain a constant and steady pressure. When starting out, make sure you apply more pressure on the front of the planer to avoid any sort of tilting, which would also gouge the wood.
- Maintain a steady and constant pressure throughout the cut and remember to move fairly slowly to get a more even, finished cut edge.
- As you near the end of the workpiece, make sure you shift most of the pressure on the tool towards the rear (trigger hand) and this will help minimize the front end of the planer from dipping down and taking out more material than you want.
What Are They Used For?
There aren't that many uses for an electrical hand planer, especially when you compare it to say, a drill or circular saw but it does serve its purpose in a few key areas of woodworking and in the construction process as well. Here is a list of some of the most on and uses for one of these handheld planers:
- Doors - A planer is a go-to choice if you want to take off a little bit from the edge of the door. Sometimes doors swell over time and will not shut properly anymore so a planar is used to play in the edge of the door so it will shut properly.
- Straightening Out Framing - When you are building a new house, the process can take several months in the studs and joists you used for the walls, floor and ceiling will likely shrink. I planer can be used to straighten out some of these problems by taking off a little bit of material on studs, joists or rafters that are lower than all of the rest.
- Cutting Rabbets - Rabbets can come in handy and are typically used in making doors, cabinets and some furniture. Using a guide withthe planer is the best way to go and will give you a much better (and straighter) end result.
- Champhering Edges - A planer can be used for champhering edges but it is not as accurate as some other tools that can also achieve this. You have to keep the planer stable and at the desired angle THROUGHOUT the entire cut, which is nearly impossible without using a guide of some sort.
- Hand Scraped Look - A hand planer (electric) can make old wood material (like pallets) look fresh, by removing the top layer of oxidized wood, revealing the newer more vibrant color underneath. Using one of these smaller handheld planers can actually give the "hand scraped" look, using the right technique and cut depth.
A Few Techniques That Will Help Out...
Some of the techniques (or tips) regarding handheld electrical planers I have already mentioned in the article but I will reiterate them here, along with some other techniques to make the process go a lot smoother and get the best possible cut.
- Adding pressure to the front of the tool (when starting) will result in a smoother start and lessen the possibility of "snipe" issues.
- Make sure the blades are sharp, this will have a great imapct on how the cut will look but will also make the tool work a lot better.
- Applying more pressure to the back of the planer when you are reaching the end of your workpiece will greatly help eliminate "snipe" issues.
- If you want to completely eliminate the chance of any snipe, then you can use additional pieces of work at the beginning and end of your workpiece which will greatly eliminate the possibility of any type of snipe from happening.
- Practice using the planer on a couple of sample boards if you are planning on using it, more expensive piece of wood, using the same material to get a feel for how it's going to cut and act.
- If you are planing studs or any other type of framing material that will be covered up by drywall or some other type material, don't worry about how the cut will look. Use a slightly faster speed and experiment with how much material you can take off in one pass and it will make the job go a lot faster.
- Using a guide or marking out a straight line prior to any planing will help you stay straight throughout the entire cut. This is recommended for longer workpieces that require a very straight cut line.
- Using the depth adjustment knob will increase the amount of stability control you have over the planer and is a lot safer too.

