
I wanted to do a step-by-step tutorial on how to build some pretty simple and rustic bar stools that I found online.
These are simple to build, cheap and make a great addition to an indoor or outdoor bar area.
All of the pieces are made from 2x4s so it is super easy to build and very easy to put everything together. This was probably one of my favorite projects to date and I'm sure you'll enjoy it too!
Let's get started!

Here is a list, or a couple of lists that will help you get a glimpse of the materials and tools you will need to build one of these rustic looking 2x4 bar stools. This is for 1 bar stool...
TOOLS NEEDED:
- A power drill
- 2 1/2" screws
- Kreg screws
- A drill of some sort (cordless or corded)
- A circular saw or a miter saw
- A tape measure
- A pencil or pen to mark with
- A speed square will also come in handy
- A kreg jig setup
- At least one clamp
- Some wood glue
MATERIALS NEEDED:
- (4) 2x4's (eight feet long)
- (1) one pound box of screws
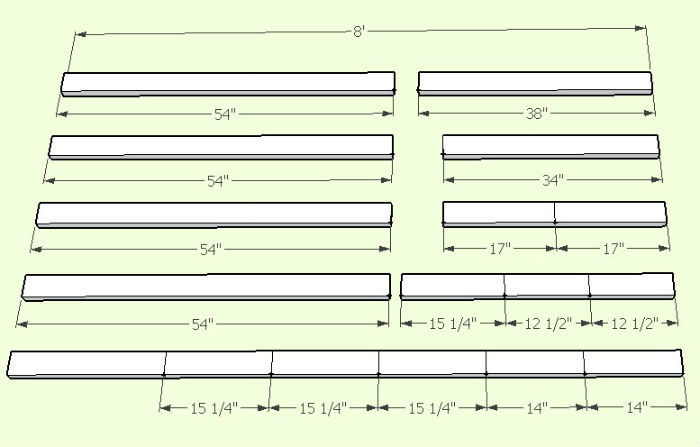
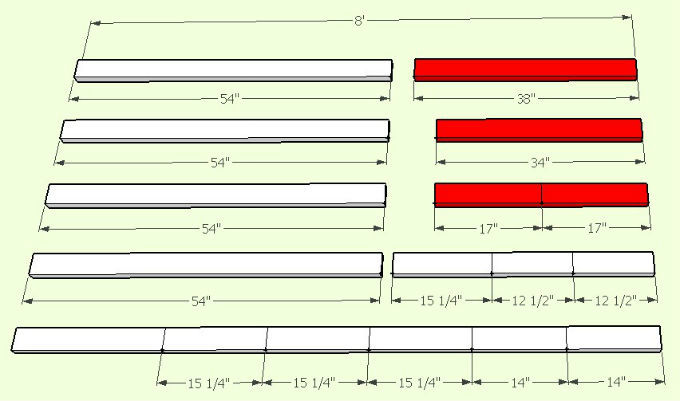
CUT LIST: (Take a look at the image below before cutting anything!)
- (2) 2x4's @ 48"
- (2) 2x4's @ 28 1/2"
- (13) 2x4's @ 11"
- (4) 2x4's @ 18"
Estimated Cost To Build: $20 - $25
First Steps!
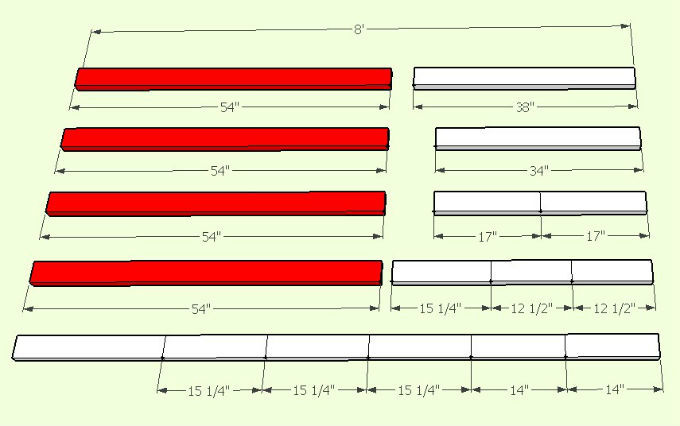
The first step is to cut all of the boards you will need for the project because it will make the process a lot faster and help you get the most out of the boards that you have.
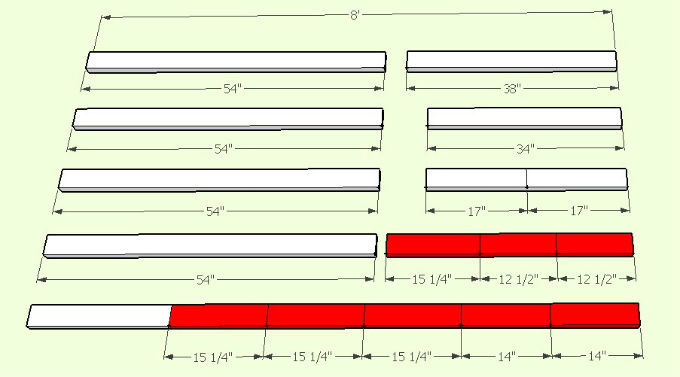
The picture below shows one way of laying out the boards to get all of the cuts you need. Note: all of the boards are 8' long.

click image to enlarge
You will also want to make 4 pocket holes (2 on each end) for all of your 11" pieces. There should be 13 of these in total and we are using 1 1/2" material so set your Kreg jig at 1 1/2" and use 2 1/2" screws.
This will speed up the process when it comes time to assemble everything.

A Couple Of Helpful Tips...
1.
It is a good idea to use wood glue on all joints that will be screwed together to give the joint more strength. Titebond is a great choice and is relatively inexpensive too.

2.
When joining the pieces of this bar stool together, you will want to clamp them together in order to get them as tight as possible, which will make the end result much stronger and a lot cleaner.

3.
After you have applied wood glue to the joints and clamped them, then you will want to use the appropriate sized pocket screws (2 1/2" for this example) to secure the joints together.

Making The Back Of The Rustic Bar Stool...
The first part of this rustic bar stool will be geared towards making the back of the stool, which is pretty simple and has a basic design to it but is modern and minimalistic too.
The back uses 7 pieces to assemble it all together and the picture below shows you which pieces you will need to use as well, which makes it a little easier.

Material Needed For These Steps:
- (2) 2x4's @ 42"
- (5) 2x4's @ 11"
- (10) 2 1/2" pocket screws

click image to enlarge
Plans For This Part Of The Project:

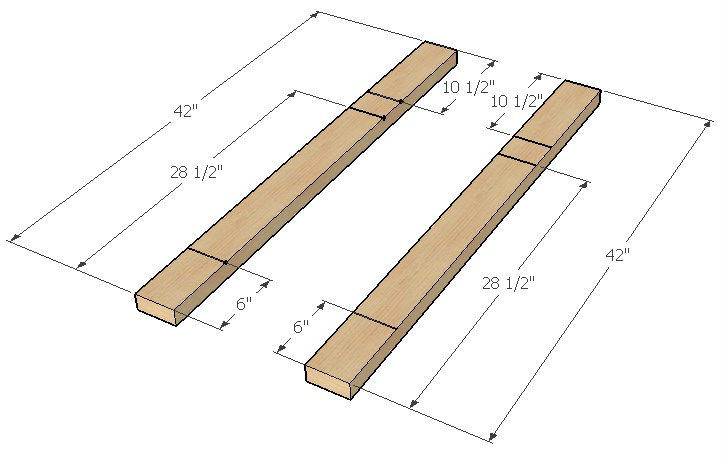
Step 1A: Marking Out The Back Of The Rustic Bar Stool
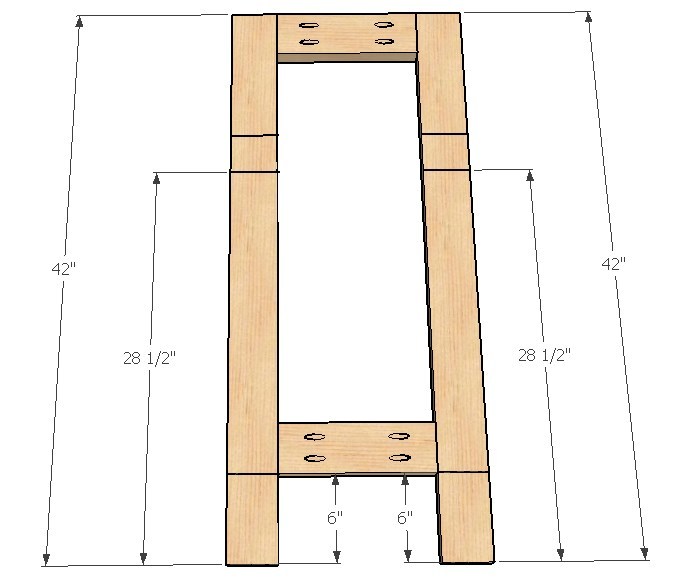
You will start by grabbing the 42" pieces and making several reference marks using a pencil. Make the marks light so you can sand them out later.
You will need to measure both of the 42" boards the same way so side by side is ideal, so you can mark both pieces.
Measure down from the top 10 1/2" and up from the bottom of the 2x4 6" and 28 1/2" and make reference marks like the image below illustrates.

Step 1B: Installing The First Four Pieces Together
Install the first two boards (11") to the other longer boards (42") as shown in the image below. The top board will be flush with the top of the outside two boards and the bottom edge of the bottom board will line up with the 6" mark on the bottom.
Remember to glue and clamp joints before screwing pocket screws into the pocket holes. Use four 2 1/2" pocket screws for each board.

Step 1C: Assembling The Final Two Boards
Now you will want to install the other two 11" pieces below the top one we installed in the previous step. There is no gap between the three 11" pieces of wood, so keep them as tight as possible.
Glue, clamp and screw the two boards to the two outer boards to make a tight, secure connection.

When joining the three boards together (in above step) the ideal total width of the three 2x4's combined should be 10 1/2".
Wood is not always the same width though so you may be a little smaller or larger than 10 1/2" and it should be noted that this is not a huge deal and is not a super important detail to be concerned with.

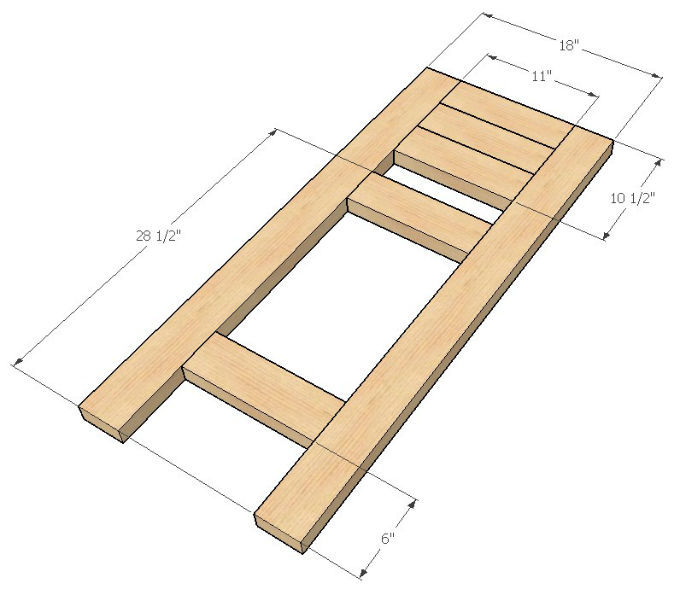
The Lower Support Pieces Of The Bench:
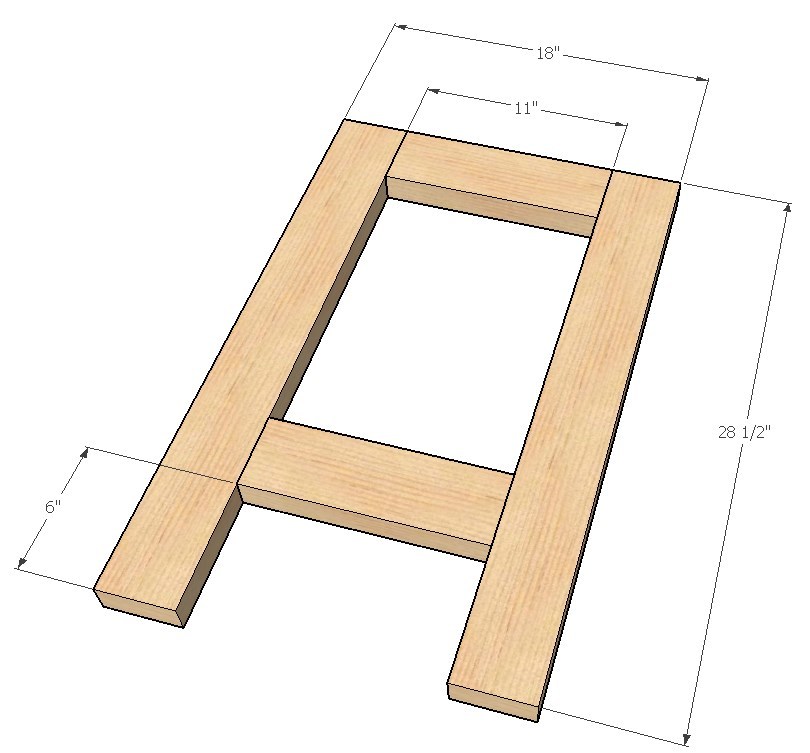
The next part of the tutorial will be constructing the front of the rustic bar stool and if you look, you might notice that it is very similar to the back but is shorter and only uses 4 pieces, instead of 7.
Building the front is really simple to do and you can see the four pieces that we will be using in the picture below.

Material Needed For These Steps:
- (2) 2x4's @ 28 1/2"
- (2) 2x4's @ 11"
- (4) 2 1/2" pocket screws

click image to enlarge
Plans For This Part Of The Process:

Step 2: Assembling The Front Of The Bar Stool...
The first step in making the front of the bar stool is to grab the two 28 1/2" pieces that we cut earlier and make marks on the bottoms, measuring up 6" from the bottom edge. Remember to make the marks light so you can sand them out later if you want to stain the wood.

Now you will need two more of the 11" pieces that have pocket holes drilled into them and place them as shown in the picture below. The top 11" piece should be flush on the top edge with the tops of the two outer boards and the bottom 11" piece should be placed so the bottom edge is aligned with your 6" reference marks.

The same process applies when installing these two 11" pieces for the front of the bar stool.
Be sure to glue the joints first and clamp them into place before securing them to the outer boards.
After the clamp is firm and the boards are firmly in place, you can screw in the 11" boards using 2 1/2" pocket screws.
There will be 4 pocket screws used for each 11" pieces, just like before and a total of 8 screws will be used to secure both 11" pieces.
Installing The Top Boards For The Bench:
The last steps in this rustic bar stool tutorial will be focused on building the seat and cross braces of the stool.
Not all of the pieces can be seen in the image on the right because of the angle but there are a total of 10 pieces that make up these next few steps.
The seat is simple and is easy to assemble onto the frame of the bar stool.

Material Needed For These Steps:
- (6) 2x4's @ 11"
- (4) 2x4's @ 18"
- (16) 2 1/2" pocket screws
- (16) 2 1/2" wood screws (galvanized if outdoors)

click on image to enlarge
Plans For This Part Of The Process:

When deciding on the orientation of the front and back sections of the bar stool, I recommend keeping the pocket holes on the backside of the bar stool. I think it looks cleaner and is less noticeable and is the orientation I am going to use for this tutorial.
Alternatively, you can buy plugs that go inside the pocket holes and have a more seamless look when it is all finished up. Plugs are pretty inexpensive and will only run you around $5 - $7 for 50 of them.

Step 3: Attaching The Seat And Braces On The Bar Stool...
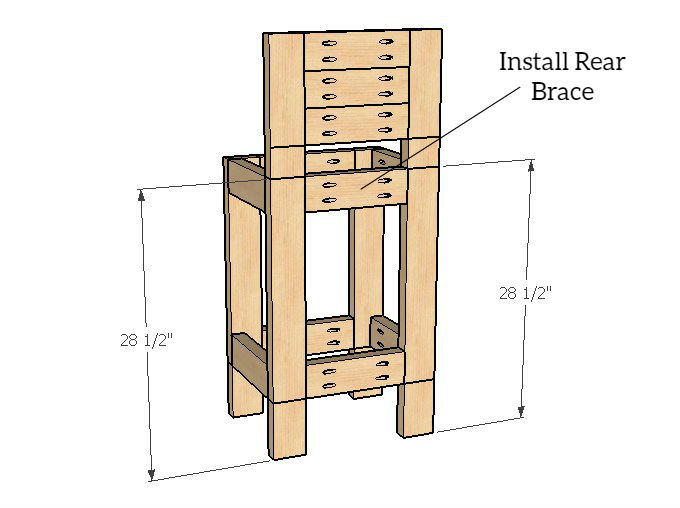
Now you will want to lean the front and back pieces of the bar stool up and space them 11" apart from inside to inside, like the picture below illustrates. This step will be much easier if you have someone helping you, holding the pieces in place.
You will also need to make three reference marks. Two of them are 6" from the bottom of the legs up and one on the back of the bar stool, measuring up 28 1/2" from the bottom. Repeat this process on the opposite side as well.

Now you will need two more of the 11" braces to fit on the sides of the bar stools, lined up on the reference marks we made in the previous step. Using two separate clamps is ideal and makes it much easier but you can do one at a time if you only have access to one clamp.
Remember to glue the joints before clamping for a tighter, stronger bond. The pocket holes are facing the inside of the bar stool and will not be visible from the outside, making the finished look much cleaner.
After you have both 11" pieces lined up properly, secure using four pocket screws for each 11" brace (8 in total).

After you have two 11" braces installed on the other side, flip the bar stool around and repeat the same steps on the other side. You should have reference marks on this side as well for the 11" braces that get installed on this side too.

This next step I am adding because I overlooked it when putting together the back of the bar stool (the first few steps).
Install another 11" piece at the 28 1/2" reference marks we made in the first few steps and glue, clamp and screw like we did for the other 11" pieces in this tutorial.

This step is optional but I like to add a little more stability in the seat so I chose to use the last two 11" pieces and placed them in the corners of the seat running from front to back, like the picture illustrates below.
The pocket holes are facing the ground to hide them and (as always) be sure to glue, clamp and screw the supports into place from the underside.

You can apply wood glue to the surfaces of the frame of the bench (where the seat boards will meet the frame) if you want to for a stronger bond. This will also help keep the boards in place for a much longer time and ensure the longevity of the seat too.
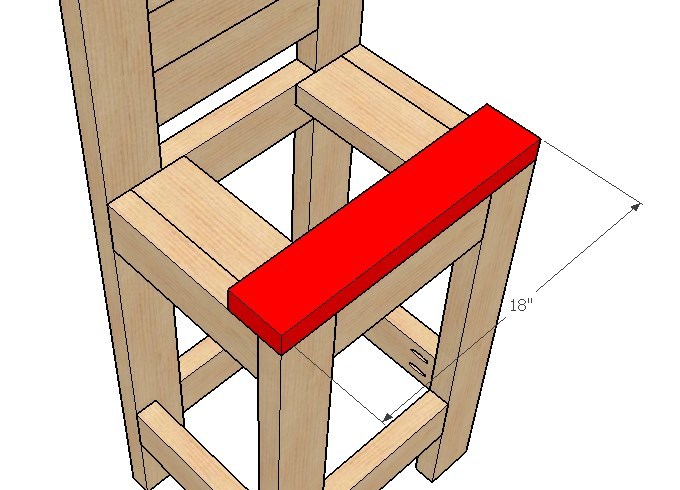
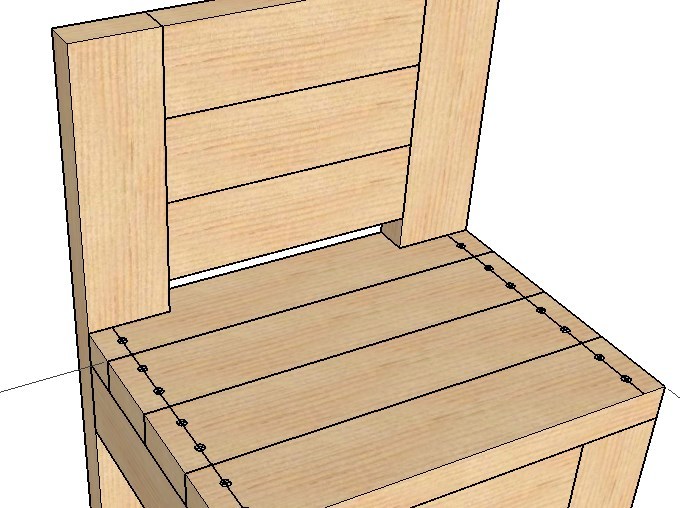
We are now going to use our last boards (18" pieces) and secure them to the frame but we need to make sure that we start from the front of the stool and make our way to the back.
The 18" board should be flush with the lower frame on the front and both sides. Take your time with the positioning as this will dictate the position for the other three seat pieces.

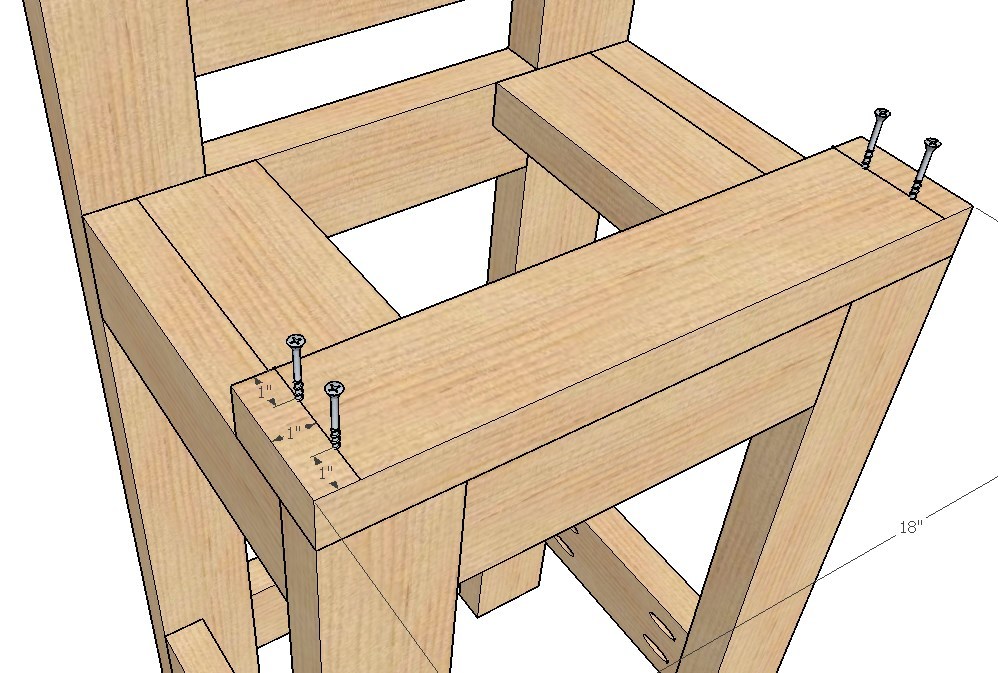
You will want to use four 2 1/2" screws (galvanized preferred) to secure the board to the frame, as shown in the image below. I made reference marks for my screws in order to get them straight and uniform at 1" from the ends in and from both edges.

Now install two more 18" boards the same way we did the first board and in this example the boards are tight against one another with NO SPACING. Installing the last board will require some minor cutting in order to get it to fit.

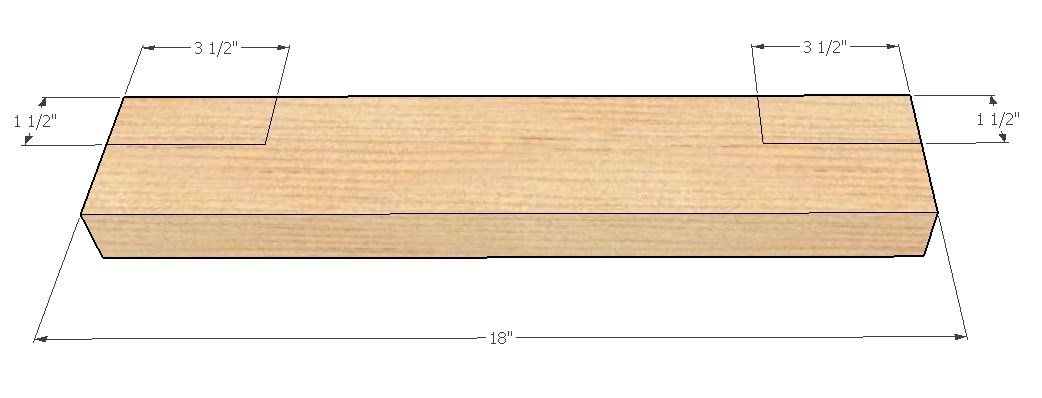
For the last board that will finish off the seat, you will need to notch it accordingly. You will need to measure 3 1/2" in from the edges and 1 1/2" from the top edge (illustration) and cut these out.

Slide the last piece in and use two screws to secure it to the frame. You can also use wood glue along the back edge and clamp it too, to get the back edge to sit tight against the frame and putting two more screws in the back of the board is also a good idea (not shown).