
I saw this style of bench many different places online and thought it was a great project to do a step-by-step tutorial on.
The plans that I found were great but assembling the bench can be hard for people who have little experience with building, in general, so this tutorial was born! Hope you like it!
Below is a complete list of all of the tools and materials needed to make one of these very simple 2x4 benches. I chose to go with screws in my example which are more suitable for this particular project.
TOOLS NEEDED:
- A power drill or a hammer
- 2 1/2" screws
- A drill of some sort (cordless or corded)
- A circular saw or a miter saw
- A tape measure
- A pencil or pen to mark with
- A speed square will also come in handy
- A drill bit and countersink bit or a kreg jig setup (optional)
MATERIALS NEEDED:
- (5) 2x4's (eight feet long)
- (1) one pound box of screws
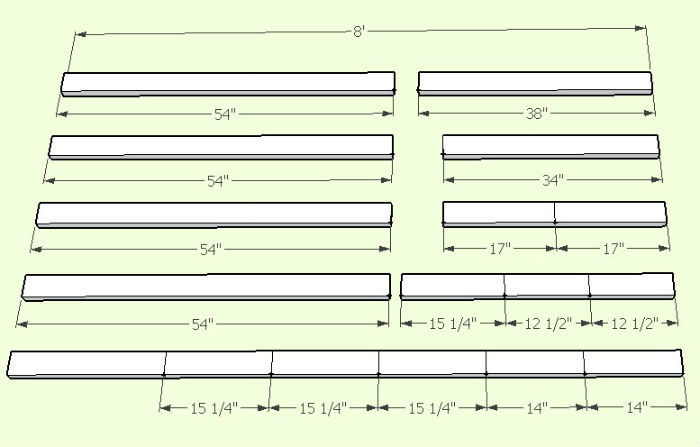
CUT LIST:
- (4) 2x4's @ 54"
- (1) 2x4's @ 38"
- (1) 2x4's @ 34"
- (2) 2x4's @ 17"
- (2) 2x4's @ 12 1/2"
- (2) 2x4's @ 14"
- (4) 2x4's @ 15 1/4"
Estimated Cost To Build: $20 - $25
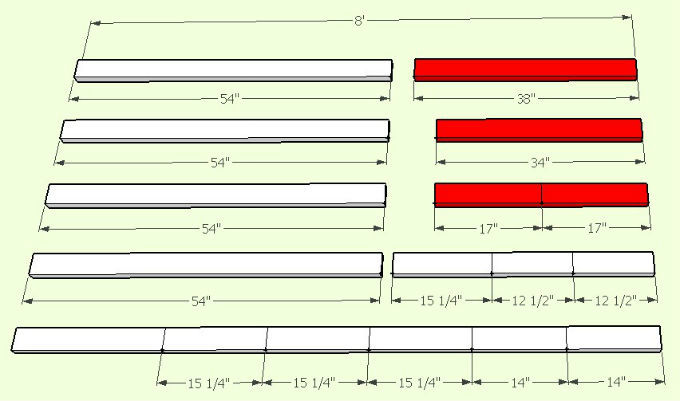
The first step is to cut all of the boards you will need for the project because it will make the process a lot faster and help you get the most out of the five 2x4 boards that you have.
The picture below shows one way of laying out the boards to get all of the cuts you need. Note: all of the boards are 8' long.

click image to enlarge
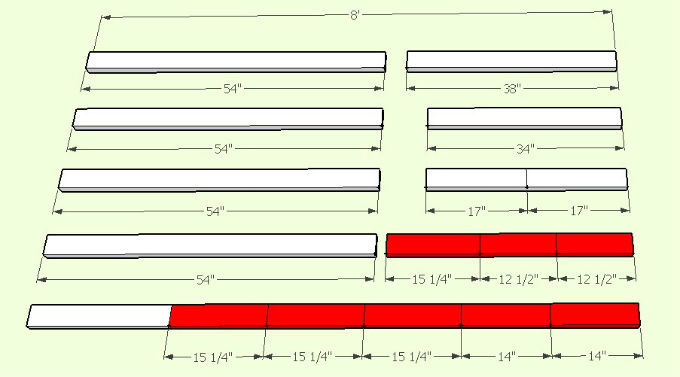
Making The Sides Of The Bench...
We are going to start building the outside frames of the 2x4 bench first since these will be a good base to build off of.
These are pretty simple to make and only require a few short pieces of 2x4's to build.


click image to enlarge
Step 1: Measure And Cut The Boards For The Sides...
For the sides of the bench, you will need:
- (4) 15 1/4" pieces
- (2) 12 1/2" pieces
- (2) 14" pieces that you cut earlier.
These will be enough for both sides of the 2x4 bench. Be aware that both sides are identical and I am showing a step by step tutorial for just one side, so make sure that you make two sides for the bench.
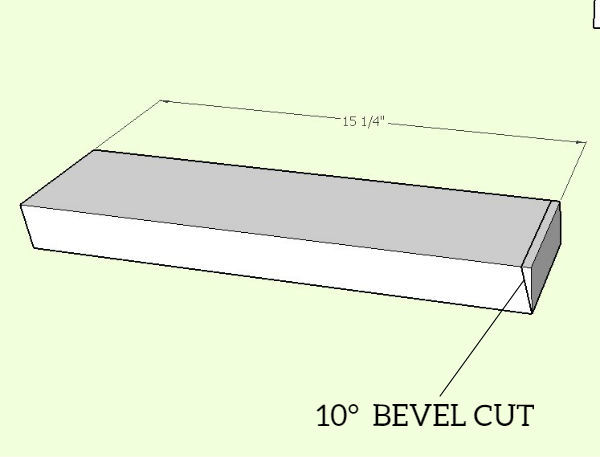
Both of the 15 1/4" pieces will be cut the same way, so after you have the first one made, use it as a template to cut the others.
The first step is to make a 10° bevel cut on one end of the 15 1/4" piece of 2x4 as shown in the picture on the right.

click on image to enlarge
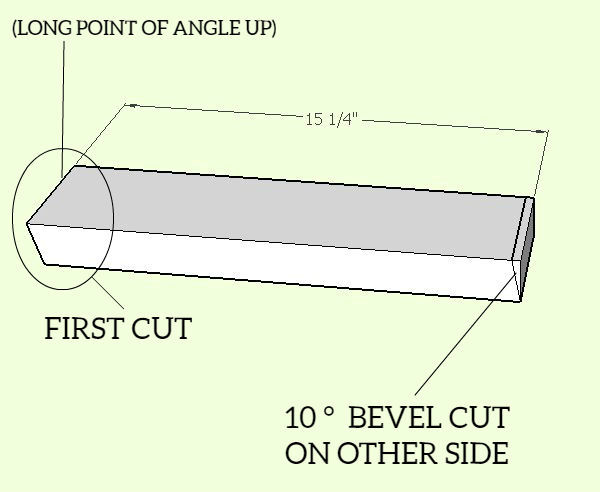
After you cut the first miter angle, flip the board 180 degrees so the long part of the angle is facing up and on the opposite side that you made your initial cut.
Then make another 10 degree miter cut the exact same way you did the first side. That's it! Now make three more!

click on image to enlarge
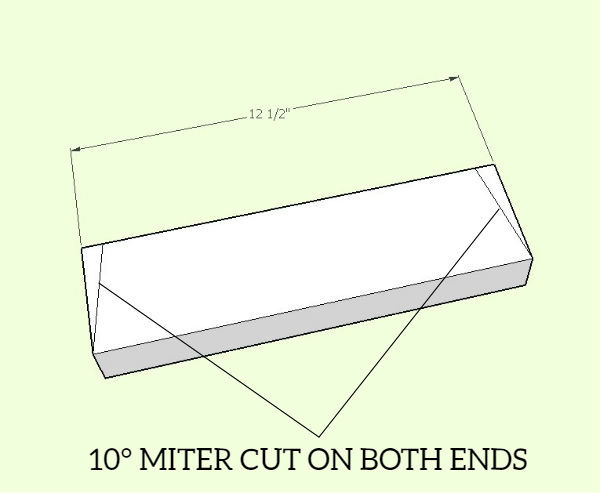
To finish up the cutting portion for the lower section of the bench, you will want to use the 12 1/2" piece and cut a 10° miter on both ends, as illustrated in the picture on the right.
A miter saw will work the best for these cuts but a speed square and a circular saw will get the job done too.

Step 2: Assembling The Sides Of The Bench...
Now you are going to use the 14" piece you cut earlier and make some reference marks for your screws and for aligning the other pieces that attach to it.
The image below shows two separate reference marks and the reference marks that are marked at 2 1/4" are for your screws and the 1 1/2" marks are for attaching the two other pieces to this piece.

Make sure you scribe a line down the side of the 2x4 and along the bottom of the piece as well for the 1 1/2" line so you can line up the other 2x4's perfectly.
The image on the right shows the underside of the piece and the reference line carried under.

Now we are going to attach the 15 1/4" pieces to the 14" piece using four screws, as illustrated in the picture below. Make sure that the 15 1/4" 2x4's are 1 1/2" from the edges, using the reference line we made in the previous step (underside of 2x4).
The bottom legs should kick outwards a little bit, so make sure you have the angles correctly positioned on the underside of the 14" 2x4.

The last step for the 2x4 bench sides is to measure up 2" from the bottom of the 15 1/4" pieces and attach the 12 1/2" piece to the legs using 4 screws, as shown below.
Make sure the 12 1/2" piece is flush to the outside of the 15 1/4" pieces and the long sides of the 10 degree miter are pointed downwards. This step would be much easier if you made reference marks at 2" and had a helper to hold everything together while you screw it in place.

The Lower Support Pieces Of The Bench:
The next steps of the 2x4 bench project include making the bottom support pieces of the bench that connect the two sides.
These consist of 4 simple pieces and only two of these pieces have miter cuts on them.


click image to enlarge
For the lower supports, you will need:
- (2) 17" pieces
- (1) 38" piece
- (1) 34" piece
The lower supports will be one of the easier parts of the bench to install and you will only need to miter the two smaller pieces (17").
Step 3: Cutting The Support Pieces...
The only two pieces of the lower support that need to have additional cuts on them are the two 13 3/8" pieces and these are 45° miters on both ends.
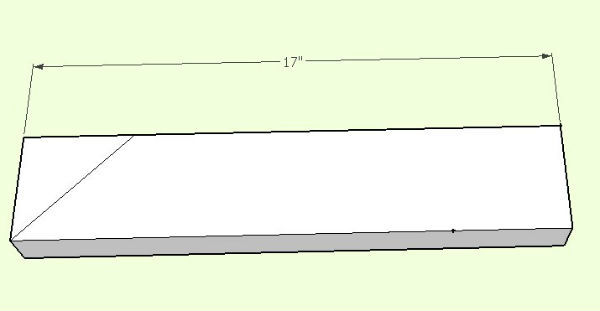
Take one of the 13 3/8" pieces and mark a 45° angle on the left side of the board as shown in the illustration on the right.
We are using one of the 17" boards to make the 13 3/8" mitered boards we will need.

click image to enlarge
After you have cut the left side angle (45°) you will need to make another 45° cut on the right side, measuring from the long point 13 3/8" and making a line like the picture illustrates.

click image to enlarge
Cut the angle and you have your angled support piece and you will then have to make one more from the remaining 17" piece you have.
Step 4: Attaching The Supports To The Sides Of The Bench:
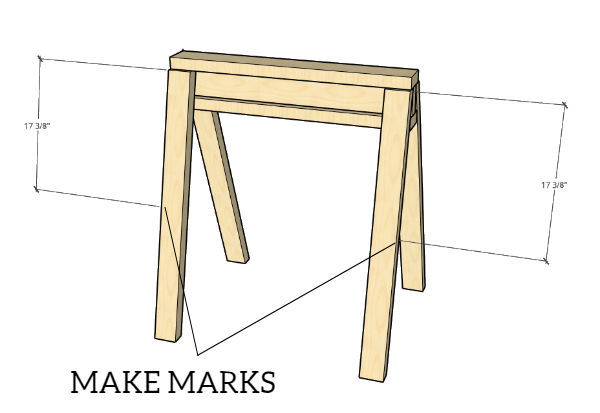
Now we are going to make reference marks on the lower and upper supports of the sides of the bench in order to align the boards that get attached in the next steps.

Then you will want to use the 38" board that you cut earlier and line it up on your reference marks and screw it into the sides of the bench. Use two - three screws for each side for best results.
The board should be flush on the top and bottom of the bottom board of the bench's side pieces.

The next step is to install the top brace (34" piece) using the reference marks we made earlier and fastening the piece to the bench's sides.

The easiest way to attach the upper support board to the bench's side pieces is to screw at an angle from the side.
Use two screws on each end to attach the brace to the side pieces, using a total of 4 screws for both sides.

Installing The Top Boards For The Bench:
The last part of the 2x4 bench project is to install the top boards that will attach to the sides and upper board of the lower supports.
These boards will not need any additional cuts and are ready to install as is.


click on image to enlarge
For the top of the bench, you will need:
- (4) 54" pieces
The top is really easy to install and will really take you more time to layout and mark the boards more than anything else.
Step 5: Attaching The Top Of The Bench...
The remaining boards you have left are the 54" boards and there should be four in total. You will need to make reference marks on all four boards, which will be the same process.
You will need to measure 6 1/2" from both ends and make a mark, as shown in the image below. These will help align the boards center on the lower portion. Do this for all four boards.

Line up the top board's reference line on the outside edge of the side piece, as shown below. The edge of the top board will also be flush to the front side of the bottom portion of the bench.
Double check to make sure both of your reference lines are lined up properly with the bottom portion of the bench, that is why we made two separate lines.

After the board is set in place, you will want to screw it into place using two screws for each end (4 per board). You can scribe a reference line for your screws if you would like at 8 1/4" so they will be nice and straight, since they will be visible.

The last step is to install the remaining boards, the same way you did for the first board. Make sure the ends of the boards are flush and keep the boards tight to each other with no gaps in between.

You could also space out the boards 1/8" if you would like to and would help with expansion and contraction. The boards would hang over the front and back edge of the bench 3/16" with a 1/8" gap between the boards, instead of being flush.