
One of my projects that is on my personal "to build" list is a kids picnic table and I thought it would make a great tutorial for people out there who want to do the same. Here goes...
Here is a quick overview of the materials and tools needed to make this kid's picnic table. It really doesn't require much as far as materials and is really a neat project to take on.
TOOLS NEEDED:
- A power drill (cordless or corded)
- 2 1/2" screws
- A drill of some sort (cordless or corded)
- A circular saw or a miter saw
- A tape measure
- A pencil or pen to mark with
- A speed square will also come in handy
- A 1/8" or 3/16" drill bit
- (2) 16d nails (used for spacers)
MATERIALS NEEDED:
- (6) 2x4's (eight feet long)
- (2) 2x6's (eight feet long)
- (2) one pound box of screws
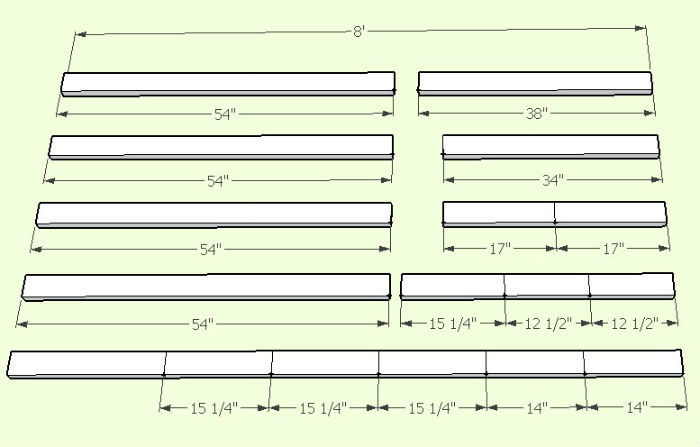
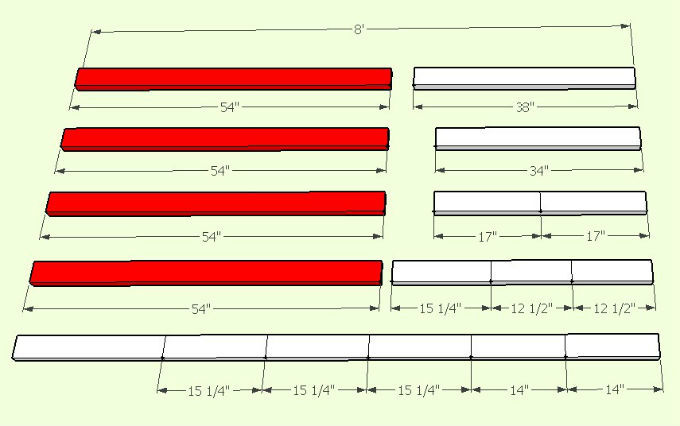
CUT LIST (refer to the diagram below for most efficient cuts):
- (4) 2x4's @ 48"
- (4) 2x6's @ 48"
- (2) 2x4's @ 22 3/8"
- (2) 2x4's @ 45 7/8"
- (4) 2x4's @ 29"
- (2) 2x4's @ 21 1/2"
- (1) 2x4's @ 37"
Estimated Cost To Build: $35 - $55
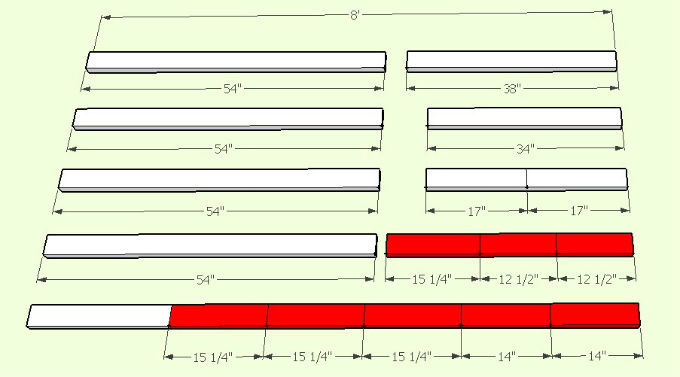
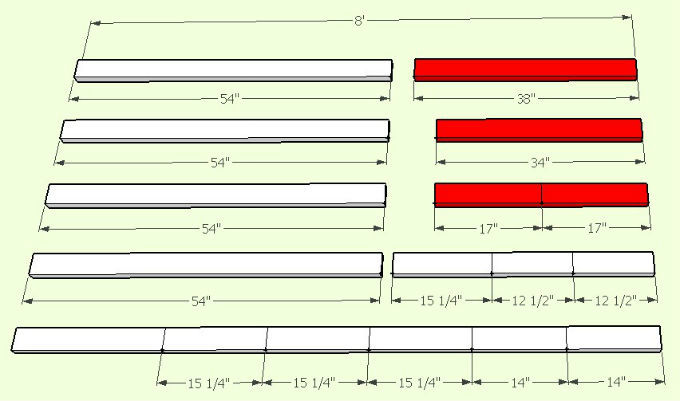
I always like to start out by cutting up the 8' lumber into smaller pieces because it makes the project much easier and faster and is a good way to save time.
The picture below shows one way of laying out the boards to get all of the cuts you need for the kid's picnic table. Note: all of the boards are 8' long.

click image to enlarge
Making The Sides Of The Bench...
We are going to start building the outside frames of the 2x4 bench first since these will be a good base to build off of.
These are pretty simple to make and only require a few short pieces of 2x4's to build.


click image to enlarge
Step 1: Cutting The Side Boards For The Bench...
For the sides of the table, you will need:
- (4) 29" pieces
- (2) 45 7/8" pieces
- (2) 22 3/8" pieces
The pieces above will be enough to make both sides of the table but I am only going to demonstrate
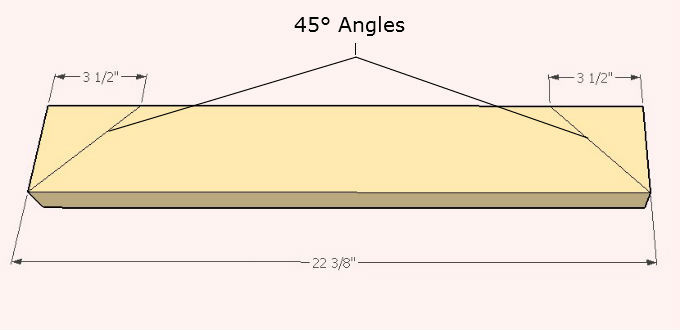
The first pieces we will be working with are the 22 3/8" long pieces. You will need to do this for both of them.
All you need to do for these is make a 45° miter cut on both ends as shown in the above illustration.

click image to enlarge
Make sure that the board still measures 22 3/8" from long point to long point after making your cuts. You should be left with a piece that looks like the picture below with the same measurements.

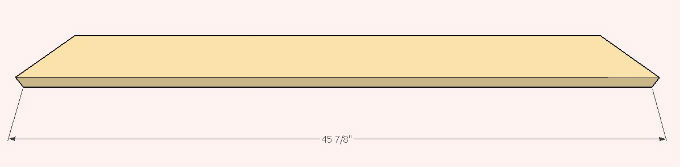
The second boards we are going to cut are the 45 7/8" boards. The cuts will be identical to the last boards, using 45° angles on both ends in the same direction and everything.

click on image to enlarge

click on image to enlarge
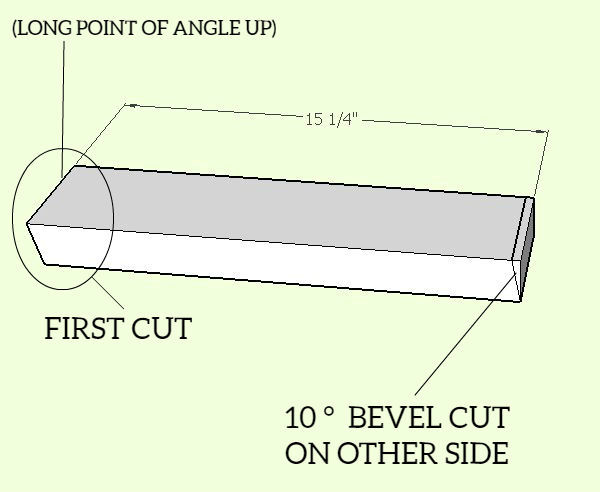
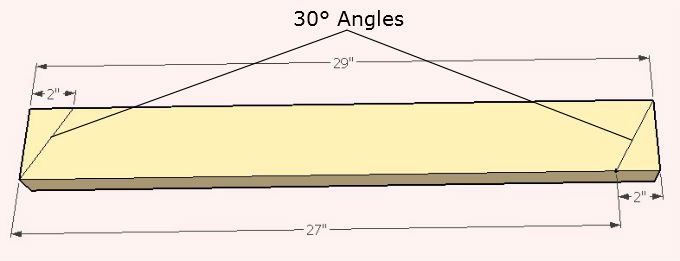
To finish up the pieces we need for the sides of the table, we will cut the 29" pieces down (4 in total). Both angles are 30° and make a note of which way the angles are positioned. Remember to make four of these in total!

click image to enlarge

Step 2: Assembling The Sides Of The Table...
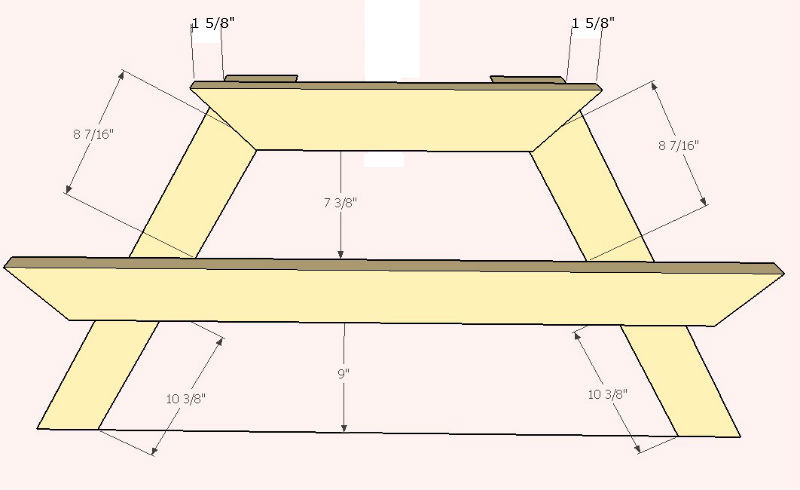
Below are a set of basic plans for the sides of the table that you can use for reference purposes, if needed.

click image to enlarge
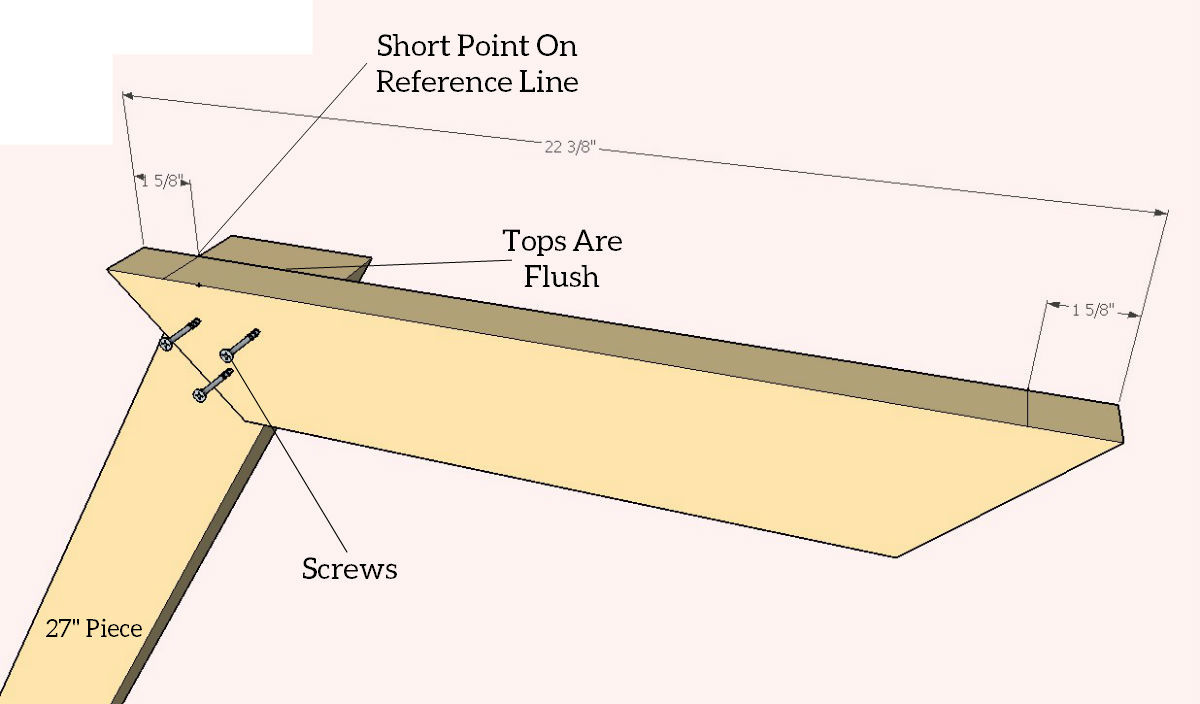
Now you are going to make marks on the 22 3/8" piece from each end and make a reference mark. This mark will be a reference point where the short point of the 27" piece will go in the following steps.

click image to enlarge
When attaching the 27" piece on the left to the 22 3/8" piece, make sure the short point of the angle on the 27" piece is at the 1 5/8" mark that we made earlier. It is also important that the tops of both pieces are flush so that the legs sit at a 30° angle.
Use three screws to fasten the pieces together in a similar pattern shown in the image below.

click image to enlarge
We are going to do the same exact thing on the other side, using another 27" piece but the piece will be rotated 180° as illustrated below. Use another 3 screws to fasten everything in place.

You should be left with something that looks like this (below) after you have attached two of the legs (27" pieces) and the top (22 3/8" piece) together correctly.

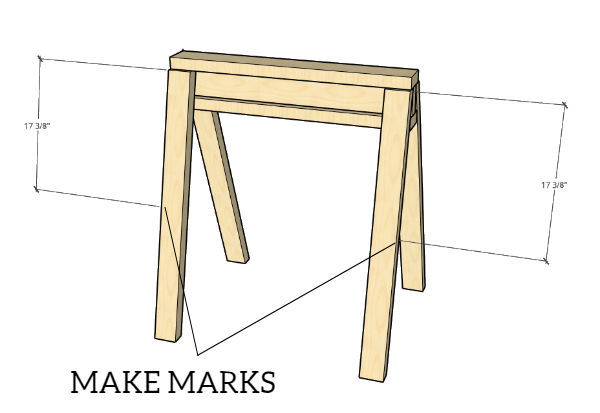
Next you will need to measure up both legs and make a mark at 14 7/16" from the long point of the angle as pictured below. This line will be the top edge of the horizontal brace that will be attached next.

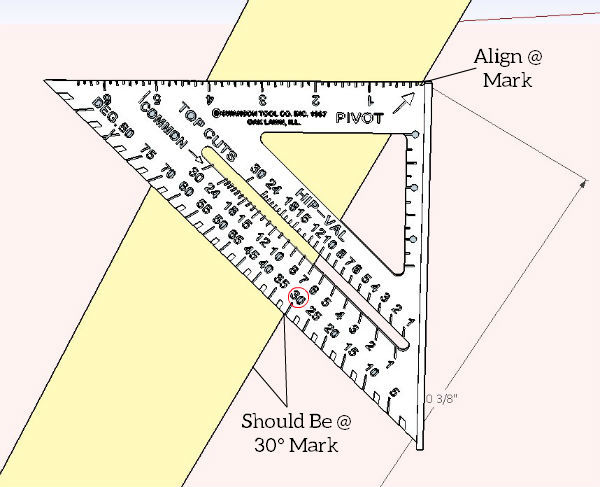
In order to get a line scribed on the legs of the table a speed square should be used.
Line up the pivot point of the square to you mark and tilt the square until the 30° mark is in line with the edge of the wood, as shown in the picture to the right.

click image to enlarge
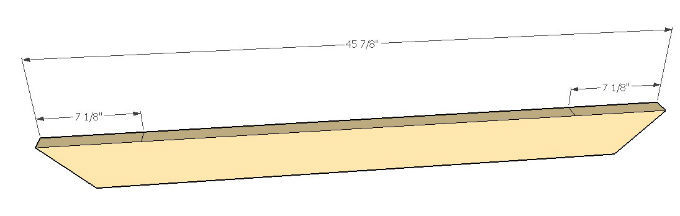
Then you need to grab the 45 7/8" piece and make mars on either end at 7 1/8" from the long point of the miter cuts, like the picture below illustrates. Make sure the board is in this position before measuring.

click image to enlarge
Now we are going to line up the marks we just made (7 1/8") the the outsides of the legs and in line with our other reference marks. The top of the board will be aligned with the reference lines that we made on the legs.
Four screws per side is recommended because these will need more strength, seeing as how they will hold the majority of the weight.

Here is a close-up of the reference lines when attaching the horizontal brace to the legs.
This is showing the right side and the smaller reference line on the left side will be mirrored.

Here is an example of a finished side of the kid's table after it is all said and done with the screws, etc.

The Lower Support Pieces Of The Bench:
The next steps of the 2x4 bench project include making the bottom support pieces of the bench that connect the two sides.
These will have 3 pieces to them and two will need to have different angles cut on either end.


click image to enlarge
Step 3: Cutting The Support Pieces...
There are only two pieces that need to be cut for the lower supports of the bench and these are the 21 1/2" pieces. One end will have a 30.5° angle (miter) and the other will have a 59.5° angle (miter).
The 37" piece will not need to be cut anymore and is ready to be attached.
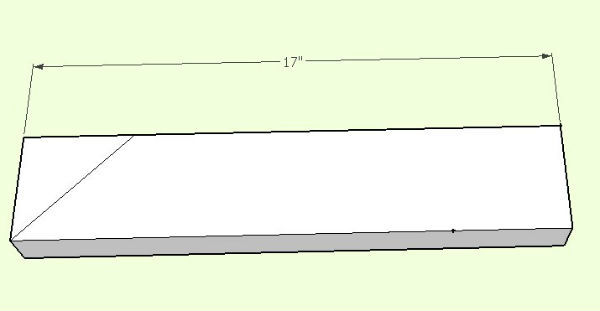
Take the 21 1/2" piece and scribe a 30.5° angle on one side and a 59.5° angle on the other side as shown in the picture below. After you have these marked, go ahead and cut the angles on both 21 1/2" pieces.

click image to enlarge
Step 4: Attaching The Supports To The Sides Of The Bench:
Now you will have to make reference marks on both of the completed bench sides on the lower braces in order to get the lower support piece centered between the two sides.

You will want to do this on both side pieces of the kid's bench in order to get the lower support centered on both sides.

Now we are going to place the 37" brace on our reference marks and screw it into both sides of the table using two screws on both sides (4 screws in total).

Now you will need to make a few reference lines in order to place the remaining two braces (upper) for the table in order to make it super stable for the little ones.
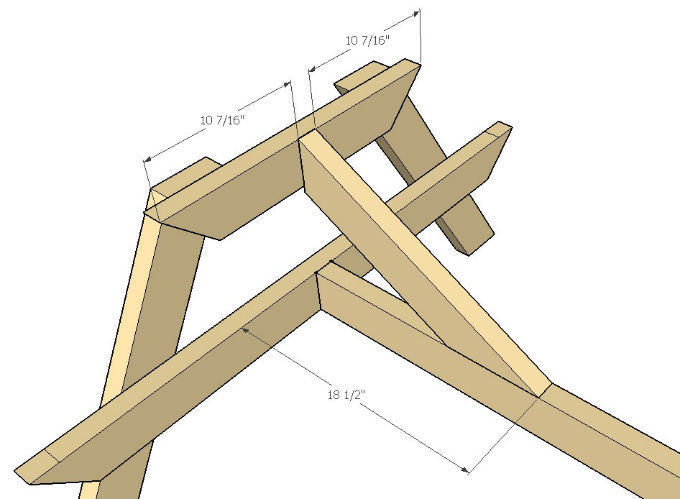
The bottom support has a center mark at 18 1/2" and the upper boards have two separate marks at 10 7/16" from the long points of the miter cuts to get the center point of the boards and is done on both upper braces.

Place one of the 21 1/2" pieces as shown in the image below. The long point of the 59.5° miter cut goes on the 18 1/2" reference point and the other end (30.5° miter) will sit in between our two reference lines on the upper support brace.
The long point of the 30.5° miter end will be flush with the top edge of the upper brace and will hang down past the bottom edge of the upper brace.

Now that the upper brace is in position, you will want to screw in the upper part into the upper side support of the table. I would recommend using two screws to attach it and make sure it is nice and tight to the board after you screw it into place.

On the bottom edge of the upper brace you will need to drill a pilot hole (1/8" - 3/16") about 2" deep into the upper brace and the board below. This will prevent the board from splitting when inserting the screw.

Now insert a screw into the pilot hole we drilled but don't bury the head of the screw, you just want it flush with the top of the board. It may split if you go too deep.

Then you will have to install the second upper brace the same way you installed the first one. Note how the pints of the two upper braces meet up.

Installing The Top Boards For The Bench:
The last part of the 2x4 bench project is to install the top boards that will attach to the sides and upper board of the lower supports.
These boards will not need any additional cuts and are ready to install as is.


click on image to enlarge
Step 5: Attaching The Top Of The Bench...
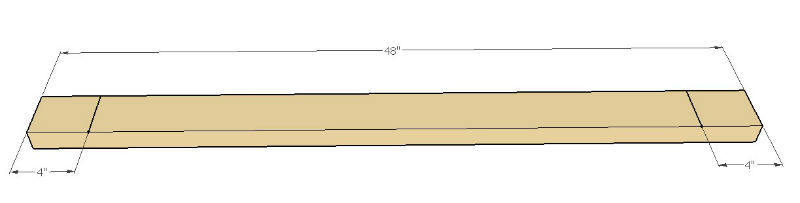
You should have four 2x6 boards that are cut at 48" and we are going to use these for the tabletop of the bench.
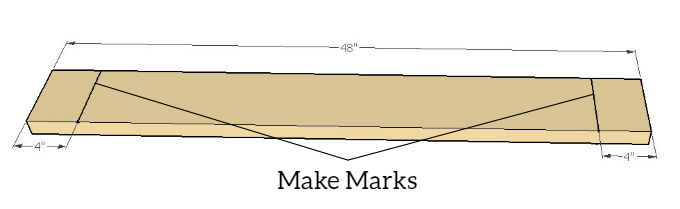
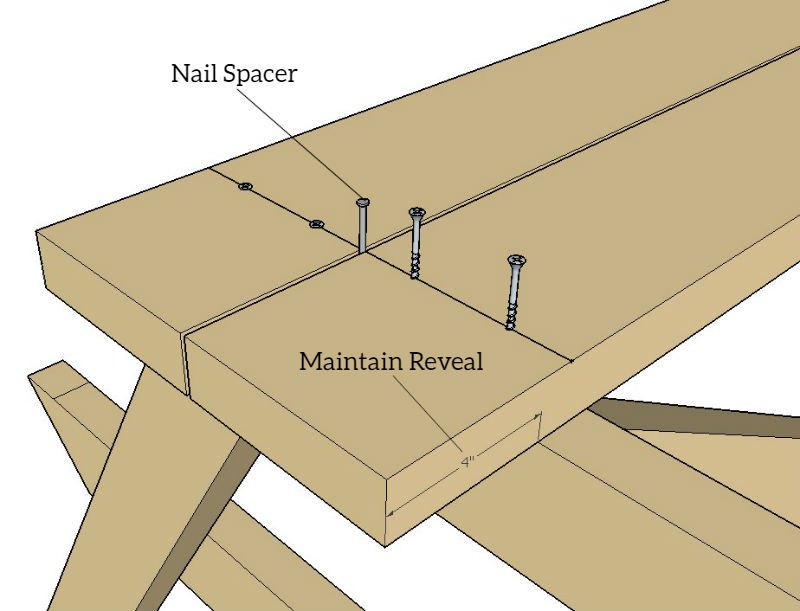
You will need to measure 4" from both ends and make a mark, as shown in the image below. These will help align the boards center on the lower portion. Do this for all four 2x6 boards.

Now you will take one of the 2x6 boards (48") and flip it over so the 4" reference marks are facing downward.
Line up your 4" reference marks on the outside edge of the horizontal brace and make sure the other side is flush with the angled miter cut. The picture below shows the 2x6 board orientation on the frame of the table.

You should have the same reveal on both sides of the board from the same point on the upper braces of the frame of the table.

Now you will want to use nails as spacers in order to space out the boards that make up the tabletop. Drive the nails into the two main supports a little ways, just so the nails stay upright, we will pull them out and reuse them later.

Now you will want to place two screws in each end to secure the 2x6 board to the frame of the table. You will have to do this on both ends.
You can draw a reference line at 4 3/4" to center the screws on the lower support that you will be screwing into and measure from the edges 1 1/2" to get the screws uniform and straight.

Now you will need to install the second board, maintaining the same 4" reveal on the ends. The other steps are the same as far as drawing a reference line at 4 3/4" to center the screws and measuring in from the edge of the board 1 1/2".

Now you will need to install the rest of the boards the same way, pulling the nail and reusing it for the other two boards. You should have something that looks like the image below.

Step 6: Attaching The Boards For The Seats Of The Bench...
Attaching the boards for the seats of the table will be very similar to the tabletop but we will be using four 2x4 pieces instead. The measurements will be a little different too but the process will be nearly identical.

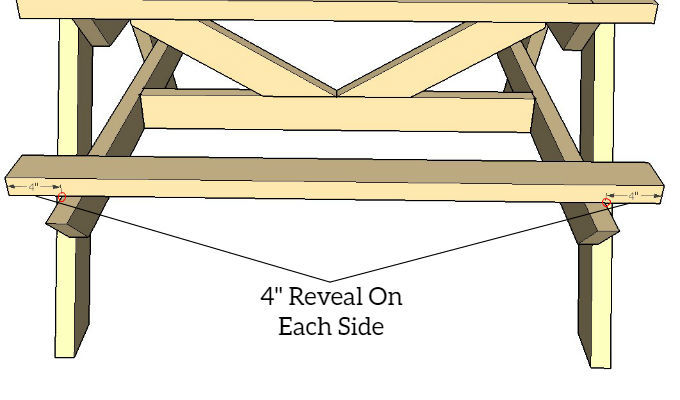
Now you'll want to position the board so that you have 4" sticking out on each side of the bench's lower support.
This will be from the outsides of the lower support, indicated by the two small red circles on the picture below.

You will want to make sure that the bottom edge of the 2x4 is touching the angled leg of the table.
This will ensure that the other board fits properly and everything comes out nice and neat looking.

Now you will want to make a couple of reference lines/points in order to get the screws uniform and straight. Start by marking a line at 4 3/4" so your screws will be straight and then make marks at 1" from each edge to get the screws an even distance from the edge.
Then install 2 screws on each end (4 screws total) to secure the board to the lower support brace. Make sure you do this on both sides of the board.

Now you can install the second board of the bench the same way you did the first board, making reference lines and points and installing two screws on each end of the bench.
You will want a 1/4" gap for the bench boards, instead of the 1/8" gap we used earlier.

Install the other two boards on the other side of the table using the last two 48" 2x4's and install them the same way. That's it! The kid's table is finished!