
Making a sawhorse is pretty easy and can be very inexpensive if you have the right set of plans. These are some simple sawhorses that I found and modified a bit that are very solid, easy to build and very inexpensive!
Here are the tools and materials needed to build one sawhorse as shown in this tutorial. The materials are for a sawhorse width of 32" and a leg height of 32". Substitute longer boards (10' or 12') if you want to modify the dimensions.
TOOLS NEEDED:
- A power drill or a hammer
- 3" screws if your using a drill or 3" nails if using a hammer
- A circular saw or a miter saw
- A tape measure
- A pencil or pen to mark with
- A speed square will also come in handy
MATERIALS NEEDED:
- (4) 2x4's (eight feet long)
- (1) one pound box of screws or nails
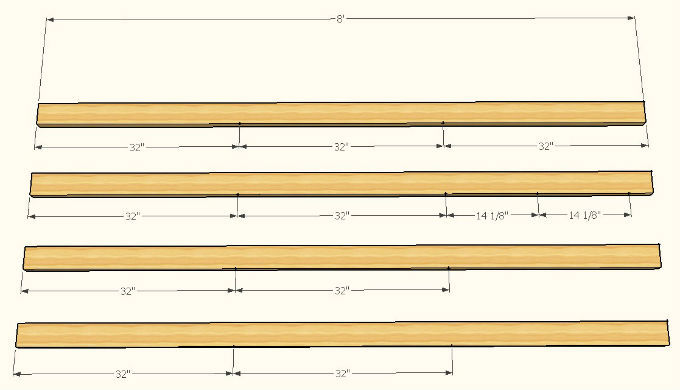
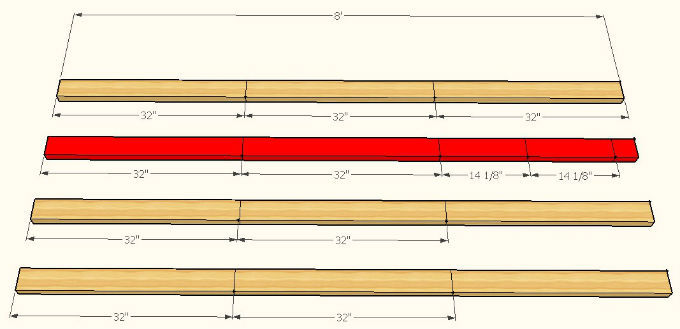
CUT LIST:
- (9) 2x4's @ 32"
- (2) 2x4's @ 14 1/8"
Here is a cut list of all of the pieces you will need and one way to get all of the pieces you will need from (4) 2x4's that are 8' long.

click image to enlarge
The first part of this sawhorse project will be how to build the top of the sawhorse.
This is the simplest part of the project and only uses three boards and screws/nails to fasten them together.


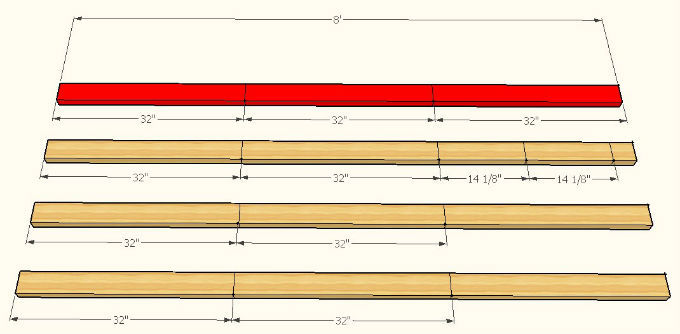
Step 1: Gather Three Boards For The Top Boards...
The first step is to grab three of the 32" boards that you cut earlier, which will be used for the top of the sawhorse. One single 8' 2x4 will provide all three pieces at a length of 32" (for this example).
An 8' 2x4 will usually be a little longer than 96" which will allow you to get the three pieces you need, even including the width of the saw blade. If you want a wider top, then I would recommend using a 10' or 12' 2x4 instead.
Step 2: Mark And Attach Boards Together...
The next step would be to get a couple of reference marks on two of the boards so you can attach them as straight as possible.
You will want to do this on two of the 2x4's on both ends (8 marks in total). This will provide you with reference points when attaching the three boards together.

Then we are going to position one 2x4 on top of another one, using your reference marks as a guide to make sure the board is centered on top of the other one. I also added another reference line down the center of the top 2x4 that will help out when fastening the two boards together.
Then you can fasten the boards together using 4 or more screws or nails for added strength and durability.

The last step in building the top of the sawhorse is to attach the remaining 2x4 to the upright using nails or screws, just like we did on the other piece and using our reference marks to align the boards on center.
This will be a lot easier to do if you flip over the board like the picture illustrates and I would recommend using 4 screws or nails for strength and durability.

The next part of the process involves making the legs that the sawhorse stands on.
You will want to consider the length of the legs vs your height in order to eliminate bending over as much as possible.


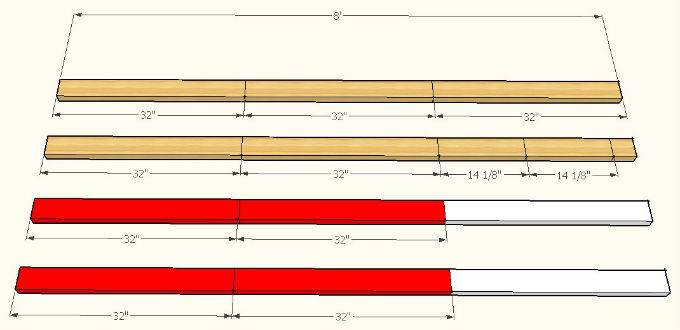
Step 3: Gather The Leg Pieces For The Sawhorse...
You will now need to grab four more of the 32" 2x4's for all four of the legs and for this example I am making the legs 32" long which will work for most average height people.
This example will require 2 (8') 2x4's to make the four legs at 32" long and will leave you with a two leftover pieces of lumber that will be approximately 32" long. The leftover pieces will not be used in this tutorial but you can use them if you would like.
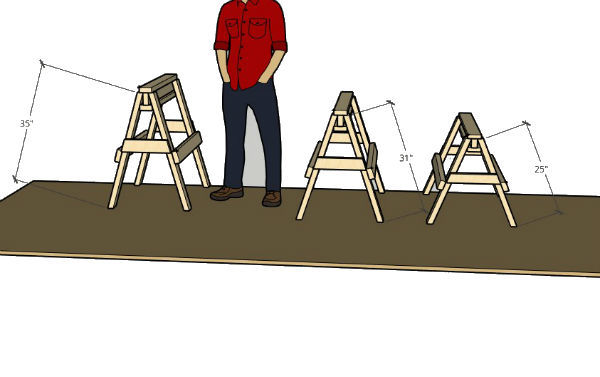
Keep in mind how long your legs should be in relationship to your height. The example below shows a 6' tall man and the lengths of the sawhorse's legs. This is an accurate representation and will help you decide on a suitable leg length for your sawhorses.

click image to enlarge
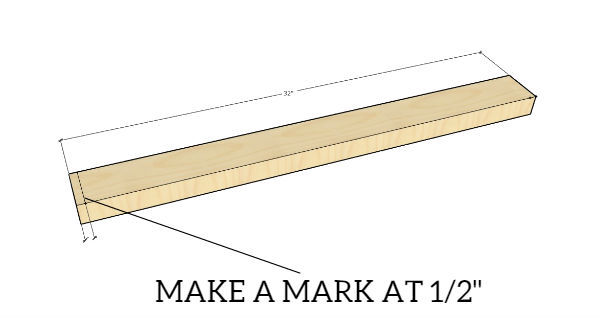
The next part is making the legs for the sawhorse. We are going to have angles on our legs so it is a stronger, cleaner look in the end.
First, you will have to make a mark and scribe a line using a speed square a 1/2" from one end as shown in the illustration.

click to image to enlarge
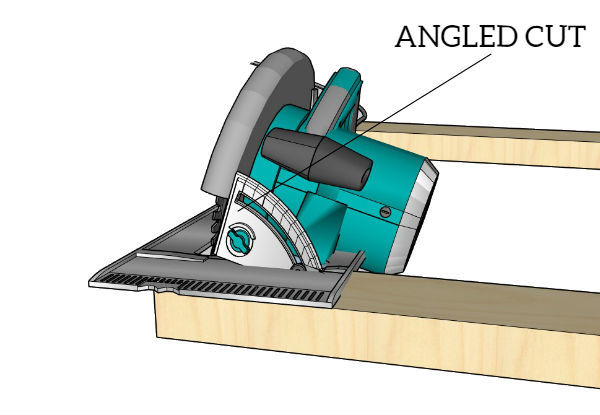
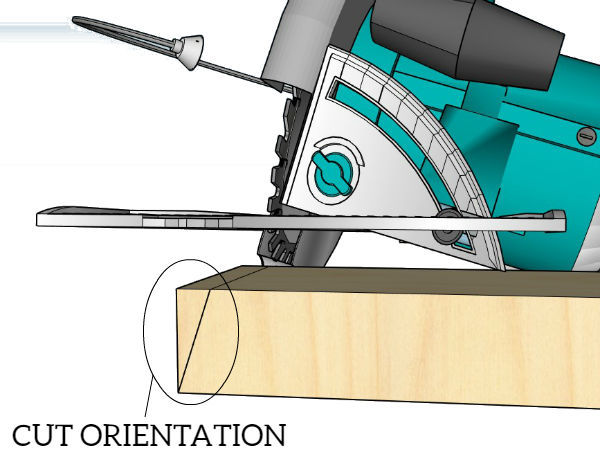
Then you will have to set your circular saw or miter saw at 16 degrees and make sure that the top side of the board will be the short side of the angle and the bottom side of the board will be the long side of the angle.

click image to enlarge

click image to enlarge
After you have made your first angled cut at 16 degrees, you will flip the board 180 degrees to cut the same angle on the other end.

You will measure out 1/2" again and cut the angle (16 degrees) just like the other side to make a finished leg. Remember, you will have to cut 4 of these legs in total.

You do not have to cut angles on the legs if you do not want to. You could just have four 2x4's cut at a straight 90 degree angle and use those for the legs if you want and they will work just fine.
Step 4: Attaching The Legs To The Top:
To attach the legs of the sawhorse to the top piece, you will want to line up the angled cut along the bottom side of the top board.
You will also want the board flush to the end of the top piece, making the legs as wide as possible for more stability.

Now you will have to screw or nail the leg of the sawhorse to the top of the sawhorse using two screws that will get attached at a 90 degree angle, as shown in the illustration below. Repeat these steps for all four legs.

Now comes the braces for the sawhorse which makes the sawhorse more stable overall and a lot more durable.
There are 4 in total and makes for a heavy duty sawhorse design.


Step 5: Installing The Braces For The Legs...
For the braces used in this tutorial, you will need two of the 32" pieces (the last two) and the two 14 1/8" pieces. We will have to cut the two 14 1/8" pieces before we install them.
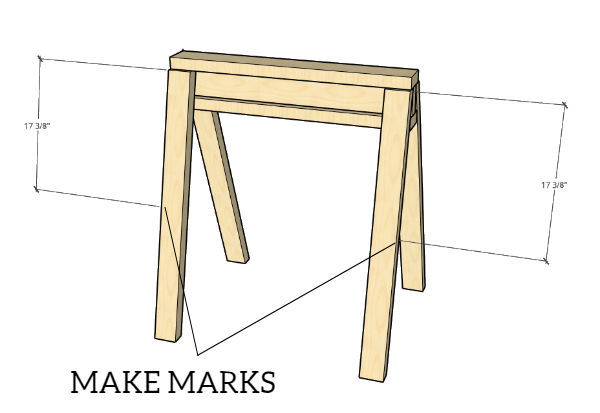
Next, you will want to measure down 17 3/8" and scribe a line using your speed square. This will be the top edge of the brace.

Now we are going to install the longer braces using screws (recommended), making sure that the top edge of the brace is on our reference line and that the ends of the brace are flush with the outside edge of the sawhorse legs.
Do this for both sides of the sawhorse, using the two braces you cut from that leftover piece of 2x4 earlier.

Now you will need one more 2x4 to complete the smaller braces and I just used another 8' piece for this example. Start out by measuring and cutting two 14 1/8" lengths.

Then, you will need to draw a line and cut the angles for the small brace to properly fit the sawhorse. You can either measure out 1", make a mark and trace a line or use a speed square to find 16 degrees and scribe a line that way.
You will have to cut two of these for your sawhorse.

Measure down from the top edge of the legs 13 11/16" and make a line on each leg (all four). This will be where the top edge of the smaller brace will go and will make lining everything up much easier.

The last steps to complete the sawhorse include attaching the small brace to the other sides of the sawhorse. Line up the brace on the reference lines you made earlier, making sure that the edge of the brace (left and right sides) are also flush with the legs of the sawhorse and use 2 screws to tighten one side.
Then make sure everything is lined up on the other side and insert 2 more screws. Do this for the other side as well and you're all done!